

Troubleshooting
This document shows common issues and solutions to any problems a user can meet.
Installation
Section titled “Installation”filesystem `btrfs’ doesn’t support blocklists
Section titled “filesystem `btrfs’ doesn’t support blocklists”The error during the installation:
grub-install: warning: this GPT partition label contains no BIOS Boot Partition; embedding won't be possible.grub-install: error: filesystem `btrfs' doesn't support blocklists.is caused when the partition table is GPT and you are not using EFI boot mode. If you would like to use GPT, remember to use EFI instead of BIOS/Legacy mode.
time warp or clock problem
Section titled “time warp or clock problem”During the installation of Athena, if you get an error like:
gpg: key <keyid> was created 3474 seconds in the future (time warp or clock problem)it can occur when you are installing Athena OS by an ISO that has been released just now. To solve the issue, just wait 30 minutes and boot again by the ISO.
The cause of the issue is due to a key in /etc/pacman.d/gnupg that has been generated in a Live Environment that has a different time of the running installer. Since in Live Environment the time changes and fixes to the right time after some minutes, if this change is done during the running of pacman-key --init, it causes that error. For example, the Live Environment shows 18:40 and during the install, it switches to 19:40, so the running installer, if creates new key by pacman-key --init when the time of Live Environment is switched, it cause the error. If you get this error, boot on Live Environment and, before to run the installer, wait for some minutes that the time clock fixes automatically.
Restore GRUB
Section titled “Restore GRUB”For fixing the GRUB, before exiting from the Live Environment, before proceeding, you must detect the existing Linux partition and the EFI partition containing the GRUB entries for Linux and Windows (or other OS). You can do that by running sudo fdisk -l.
Let’s guess the existing Linux partition is /dev/sda3 and the boot efi partition is at /dev/nvme0n1p1.
If your existing Linux distribution is based on BTRFS file system, run:
sudo mount -o subvol=@ /dev/sda3 /mntsudo mount -o subvol=@home /dev/sda3 /mnt/homesudo mount -o subvol=@log /dev/sda3 /mnt/var/logotherwise run:
sudo mount /dev/sda3 /mntsudo mount /dev/sda3 /mnt/homesudo mount /dev/sda3 /mnt/var/logThen, run:
mkdir /tmp/intermediatesudo mount /dev/nvme0n1p1 /tmp/intermediatesudo mount --bind /tmp/intermediate /mnt/efi/
sudo arch-chroot /mnt
Now, check the directory tree in /efi folder and you should have only these files/directories:
'$RECYCLE.BIN' EFI 'System Volume Information'Check the EFIdirectory and be sure that there are not nested further EFI directories otherwise your GRUB never work. You must have only the current EFI directory with the following files/directories:
Boot MicrosoftIf you see also another EFI directory or other ones containing the file grubx64.efi (i.e., GRUB directory), delete these folders. Note that in other distros, GRUB folder could have a different name. Don’t worry to delete GRUBfolder by:
rm -rf /efi/EFI/GRUBThe next command will create it again.
Then run:
grub-install --target=x86_64-efi --efi-directory=/efi --bootloader-id=GRUBThis command will create the file /efi/EFI/GRUB/grubx64.efi.
Finally:
grub-mkconfig -o /boot/grub/grub.cfgat reboot, be sure that on BIOS the GRUB entry has the first priority over Windows Boot Manager. Then, it should work.
Once landed on your working and fixed Linux environment, open the terminal and run:
sudo grub-mkconfig -o /boot/grub/grub.cfgto restore the Windows entry in GRUB in case it is missing. Reboot the system to check all GRUB entries are working as intended.
In case you previously formatted your EFI partition, its UUID could be changed, so, at this point, when you boot, you could get an error and be dropped on the emergency shell:
[ TIME ] Timed out waiting for device /dev/disk/by-uuid/0EBF-C0AD.[DEPEND] Dependency failed for File System Check on /dev/disk/by-uuid/0EBF-C0AD.[DEPEND] Dependency failed for /efi[DEPEND] Dependency failed for Local File Systems.You are in emergency mode. After logging in, type "journalctl -xb" to view system logs, "systemctl reboot" to reboot, or "exit" to continue bootup.Give root password for maintenanceTo fix this, boot again by USB to the Athena OS Live Environment and mounting the devices as done before, like: If your existing Linux distribution is based on BTRFS file system, run:
sudo mount -o subvol=@ /dev/sda3 /mntsudo mount -o subvol=@home /dev/sda3 /mnt/homesudo mount -o subvol=@log /dev/sda3 /mnt/var/logotherwise run:
sudo mount /dev/sda3 /mntThen, run:
mkdir /tmp/intermediatesudo mount /dev/nvme0n1p1 /tmp/intermediatesudo mount --bind /tmp/intermediate /mnt/efi/
sudo arch-chroot /mnt
Once you are on chroot environment, run:
sudo blkid /dev/nvme0n1p1replace /dev/nvme0n1p1 by your EFI partition device. This command gives you the valid UUID of your EFI partition, for example:
/dev/nvme0n1p1: UUID="E856-25BA" BLOCK_SIZE="512" TYPE="vfat" PARTLABEL="EFI system partition" PARTUUID="71e827d6-2276-46f2-816b-881e51c53d30"Then, you must edit fstab to replace the old EFI UUID with this new one. So, open the fstab file by:
nano /etc/fstaband you should get something similar to:
# /etc/fstab: static file system information.## Use 'blkid' to print the universally unique identifier for a device; this may# be used with UUID= as a more robust way to name devices that works even if# disks are added and removed. See fstab(5).## <file system> <mount point> <type> <options> <dump> <pass>UUID=0EBF-C0AD /efi vfat umask=0077 0 2UUID=f1392ba6-7931-4805-8af1-8fb48bca8f4c / btrfs subvol=/@,noatime,autodefrag,compress=zstd 0 0UUID=f1392ba6-7931-4805-8af1-8fb48bca8f4c /home btrfs subvol=/@home,noatime,autodefrag,compress=zstd 0 0UUID=f1392ba6-7931-4805-8af1-8fb48bca8f4c /var/cache btrfs subvol=/@cache,noatime,autodefrag,compress=zstd 0 0UUID=f1392ba6-7931-4805-8af1-8fb48bca8f4c /var/log btrfs subvol=/@log,noatime,autodefrag,compress=zstd 0 0Replace the UUID value of the line containing /efi with the one obtained by the sudo blkid command above. Save the file, exit from chroot environment by exit command, and reboot the system. Again, at reboot, be sure that on BIOS the GRUB entry has the first priority over Windows Boot Manager. Then, it should work.
Once landed on your working and fixed Linux environment, open the terminal and run:
sudo grub-mkconfig -o /boot/grub/grub.cfgto restore the Windows entry in GRUB in case it is missing. Reboot the system to check all GRUB entries are working as intended.
Restore Linux and Windows EFI Boot
Section titled “Restore Linux and Windows EFI Boot”In case you broke the EFI partition containing Linux and Windows EFI Boot files (assuming they were on the same partition), download a Windows ISO and burn it on a USB key. Then, boot up it. If needed, backup your data.
When you reach the Windows installation environment:
- select your language and keyboard layout
- click on Repair your computer button
- click on Troubleshooting
- click on Command Prompt
- run diskpart
- run list disk and identify the disk number of the disk containing the Windows EFI Boot partition
- run sel disk <number> where <number> must be replaced with the number of the interested disk
- run list part and identify the partition number of the partition of the selected disk containing the Windows EFI Boot. Usually it is tagged as System and it has small size
- run sel part <number> where <number> must be replaced with the number of the interested partition
- run delete partition override to delete the current broken EFI partition
- run create part efi size=100 for creating a new EFI partition (the size must be at least 100 MB)
If you get an error stating:
it means that the disk where you are creating the EFI disk is not GPT. If it is already GPT type, skip to the next step. If not, you need to make it GPT type as follows. Boot on Linux Live Environment by a USB pendrive and use testdisk tool. Open the terminal and run:MSR and EFI are Only Supported on the GPT Disk.Choose if logging or not. Then select the disk where you will restore the EFI partition:
Terminal window testdiskThen select EFI GPT:Select a media (use Arrow keys, then press Enter):Disk /dev/sda - 1000 GB / 931 GiB - ST1000LM049-2GH172Disk /dev/sdb - 4026 MB / 3840 MiB - Generic Flash DiskDisk /dev/loop0 - 2849 MB / 2717 MiB (RO)>Disk /dev/nvme0n1 - 256 GB / 238 GiBSelect Analyse:Disk /dev/nvme0n1 - 256 GB / 238 GiBPlease select the partition table type, press Enter when done.[Intel ] Intel/PC partition>[EFI GPT] EFI GPT partition map (Mac i386, some x86_64...)[Humax ] Humax partition table[Mac ] Apple partition map (legacy)[None ] Non partitioned media[Sun ] Sun Solaris partition[XBox ] XBox partition[Return ] Return to disk selectionHint: EFI GPT partition table type has been detected.Note: Do NOT select 'None' for media with only a single partition. It's veryrare for a disk to be 'Non-partitioned'.Press Quick Search:Disk /dev/nvme0n1 - 256 GB / 238 GiBCHS 244198 64 32 - sector size=512>[ Analyse ] Analyse current partition structure and search for lost partitions[ Advanced ] Filesystem Utils[ Geometry ] Change disk geometry[ Options ] Modify options[ Quit ] Return to disk selectionNote: Correct disk geometry is required for a successful recovery. 'Analyse'process may give some warnings if it thinks the logical geometry is mismatched.Press Continue:Disk /dev/nvme0n1 - 256 GB / 238 GiB - CHS 244198 64 32Current partition structure:Partition Start End Size in sectors1 P EFI System 2048 878591 876544 [EFI System Partition]Warning: number of heads/cylinder mismatches 255 (NTFS) != 64 (HD)Warning: number of sectors per track mismatches 63 (NTFS) != 32 (HD)2 P MS Data 878592 498274296 497395705Warning: number of heads/cylinder mismatches 255 (NTFS) != 64 (HD)Warning: number of sectors per track mismatches 63 (NTFS) != 32 (HD)3 P MS Data 498274304 500117503 1843200 [WinRE tools]P=Primary D=Deleted>[Quick Search] [ Backup ]Then select the partition:Disk /dev/nvme0n1 - 256 GB / 238 GiB - CHS 244198 64 32The harddisk (256 GB / 238 GiB) seems too small! (< 509 GB / 474 GiB)Check the harddisk size: HD jumper settings, BIOS detection...The following partition can't be recovered:Partition Start End Size in sectors> MS Data 498274303 995670007 497395705[ Continue ]NTFS, blocksize=4096, 254 GB / 237 GiBYou will get a similar view:Disk /dev/nvme0n1: 238.47 GiB, 256060514304 bytes, 500118192 sectorsDisk model: KINGSTON RBUSNS8154P3256GJUnits: sectors of 1 * 512 = 512 bytesSector size (logical/physical): 512 bytes / 512 bytesI/O size (minimum/optimal): 512 bytes / 512 bytesDisklabel type: gptDisk identifier: A4802A1C-614B-11EE-9562-806E6F6E6963Device Start End Sectors Size Type/dev/nvme0n1p1 2048 878591 876544 428M EFI System/dev/nvme0n1p2 878592 498274296 497395705 237.2G Microsoft basic data/dev/nvme0n1p3 498274304 500117503 1843200 900M Microsoft basic dataNow you need to change some of thoseDisk /dev/nvme0n1 - 256 GB / 238 GiB - CHS 244198 64 32Partition Start End Size in sectors>P EFI System 2048 878591 876544 [EFI System Partition]D MS Data 878592 498274296 497395705D MS Data 878599 498274303 497395705D MS Data 496431105 498274304 1843200D MS Data 498274304 500117503 1843200 [WinRE tools]Structure: Ok. Use Up/Down Arrow keys to select partition.Use Left/Right Arrow keys to CHANGE partition characteristics:P=Primary D=DeletedKeys A: add partition, L: load backup, T: change type, P: list files,Enter: to continueFAT32, blocksize=4096, 448 MB / 428 MiBD(Delete) inP(Primary) to avoid that during the conversion process your partition is not deleted. To do this, move to the MS Data partitions and set them toP. Some of them cannot be set asP, probably because they are corrupt or other issues but in your case you need only those ones containing your data or have important purposes. To understand this, you can read the information on the last column is present and the size between Start and End columns, just pick the largest one if the other partitions cannot be set toP:After this, press Enter to continue and convert your disk to GPT. At the end, by testdisk, be sure that your disk is labelled as gpt and all your data partitions are still there, for example:Disk /dev/nvme0n1 - 256 GB / 238 GiB - CHS 244198 64 32Partition Start End Size in sectors>P EFI System 2048 878591 876544 [EFI System Partition]P MS Data 878592 498274296 497395705D MS Data 878599 498274303 497395705D MS Data 496431105 498274304 1843200P MS Data 498274304 500117503 1843200 [WinRE tools]Structure: Ok. Use Up/Down Arrow keys to select partition.Use Left/Right Arrow keys to CHANGE partition characteristics:P=Primary D=DeletedKeys A: add partition, L: load backup, T: change type, P: list files,Enter: to continueFAT32, blocksize=4096, 448 MB / 428 MiBDisk /dev/nvme0n1: 238.47 GiB, 256060514304 bytes, 500118192 sectorsDisk model: KINGSTON RBUSNS8154P3256GJUnits: sectors of 1 * 512 = 512 bytesSector size (logical/physical): 512 bytes / 512 bytesI/O size (minimum/optimal): 512 bytes / 512 bytesDisklabel type: gptDisk identifier: A4802A1C-614B-11EE-9562-806E6F6E6963Device Start End Sectors Size Type/dev/nvme0n1p1 2048 878591 876544 428M EFI System/dev/nvme0n1p2 878592 498274296 497395705 237.2G Microsoft basic data/dev/nvme0n1p3 498274304 500117503 1843200 900M Microsoft basic data - run format fs=fat32 quick to format the EFI partition as fat32
- run assign letter=m
- exit
- Supposing that your Windows installation is installed in C:, run bcdboot c:\windows /s m: /f uefi
- If it does not produce error, type exit for exiting the Command Prompt and click on Continue button for entering to Windows
- If it produces an error:
- run bootrec /fixmbr
- run bootrec /fixboot
- run bootrec /scanos
- run bootrec /rebuildbcd
- run bootsect.exe /nt60 all /force
- Exit from the Command Prompt and click on Startup Repair button. It should bring you to Windows.
Finally, for fixing also the Linux access, burn Athena OS ISO on a USB and follow the steps explained at Post-installation section.
Several boot entries have been disappeared
Section titled “Several boot entries have been disappeared”In case you are in dual boot and some entries are not shown anymore (i.e., Windows Boot Manager if you have Windows in dual boot), enter in Athena OS and run:
sudo grub-mkconfig -o /boot/grub/grub.cfgThen reboot.
ERROR kdfontop.c:183 put_font_kdfontop: Unable to load such font with such kernel version
Section titled “ERROR kdfontop.c:183 put_font_kdfontop: Unable to load such font with such kernel version”The message:
setfont: ERROR kdfontop.c:183 put_font_kdfontop: Unable to load such font with such kernel versioncan be fixed by disabling the deferred takeover by adding fbcon=nodefer as kernel parameter in the GRUB_CMDLINE_LINUX_DEFAULT variable of /etc/default/grub file.
Reference: #99
Display Managers
Section titled “Display Managers”GDM: login background turned to grey
Section titled “GDM: login background turned to grey”It should be caused by an update of GDM or GNOME packages that restored the default gresource theme file. To restore the Athena GDM theme, run:
sudo pacman -S athena-gdm-configBloodhound
Section titled “Bloodhound”On Bloodhound, when neo4j database is run by sudo neo4j console, we can get some errors like:
Exception in thread "main" java.lang.LinkageError: Cannot to link java.nio.DirectByteBufferFor solving it, just run neo4j server by systemctl start neo4j. You can check the proof that the server is correctly running by systemctl status neo4j.
conda activate continues to show the prompt (base) instead of (test).
The issue is related to the usage of no-repeat-flag in .bashrc. To solve this, add the following code inside .bashrc:
if [[ $1 != no-repeat-flag ]]; then __conda_setup="$('/home/kumquat/miniconda3/bin/conda' 'shell.bash' 'hook' 2> /dev/null)" if [ $? -eq 0 ]; then eval "$__conda_setup" else if [ -f "/home/kumquat/miniconda3/etc/profile.d/conda.sh" ]; then . "/home/kumquat/miniconda3/etc/profile.d/conda.sh" else export PATH="/home/kumquat/miniconda3/bin:$PATH" fi fi unset __conda_setupfi# <<< conda initialize <<<conda activate $CONDA_DEFAULT_ENVWin-Kex ESM Mode ‘cannot execute: required file not found’
Section titled “Win-Kex ESM Mode ‘cannot execute: required file not found’”This issue affects both Athena OS and Kali Linux. When you run kex --esm and you get:
/usr/bin/kex: line 389: /mnt/c/Windows/system32/cmdkey.exe: cannot execute: required file not found/usr/bin/kex: line 490: /mnt/c/Windows/system32/mstsc.exe: cannot execute: required file not foundit could be due to two reasons:
- wine is installed
- you are running Athena OS and Kali Linux WSL together
Uninstall wine package, close both the WSL sessions, open CMD in Windows and run wsl --shutdown. Run Athena OS and you should not get this error anymore.
Win-Kex ESM Mode ‘Remote Desktop can’t connect’
Section titled “Win-Kex ESM Mode ‘Remote Desktop can’t connect’”In case you get the following error:
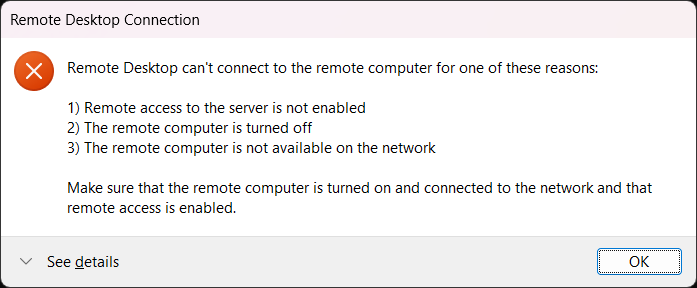
just open a new Windows terminal and run:
wsl --shutdownThen, reopen Athena OS WSL and try to run again:
kex --esm --ip -sBrowser elements overlap
Section titled “Browser elements overlap”In case it occurs that browser elements can overlap as the following case:

The reason is that the website is using the Athena OS system font instead of using its one.
In case you would like to solve this behavior on the system side, you need to delete the entry font-name='JetBrains Mono 11' set in /org/gnome/desktop/ or changing its font.
You can remove it or change the font by:
dconf dump /org/gnome/desktop/ > fix.txtEdit fix.txt and delete the line containing font-name='JetBrains Mono 11' or replace this font name with your preferred, save and close the file, then run:
dconf reset -f /org/gnome/desktop/cat fix.txt | dconf load /org/gnome/desktop/In case your theme will be reset, just run:
athena-theme-tweak -t <name of your favourite theme>Use athena-theme-tweak -l to get the list of themes to be chosen.
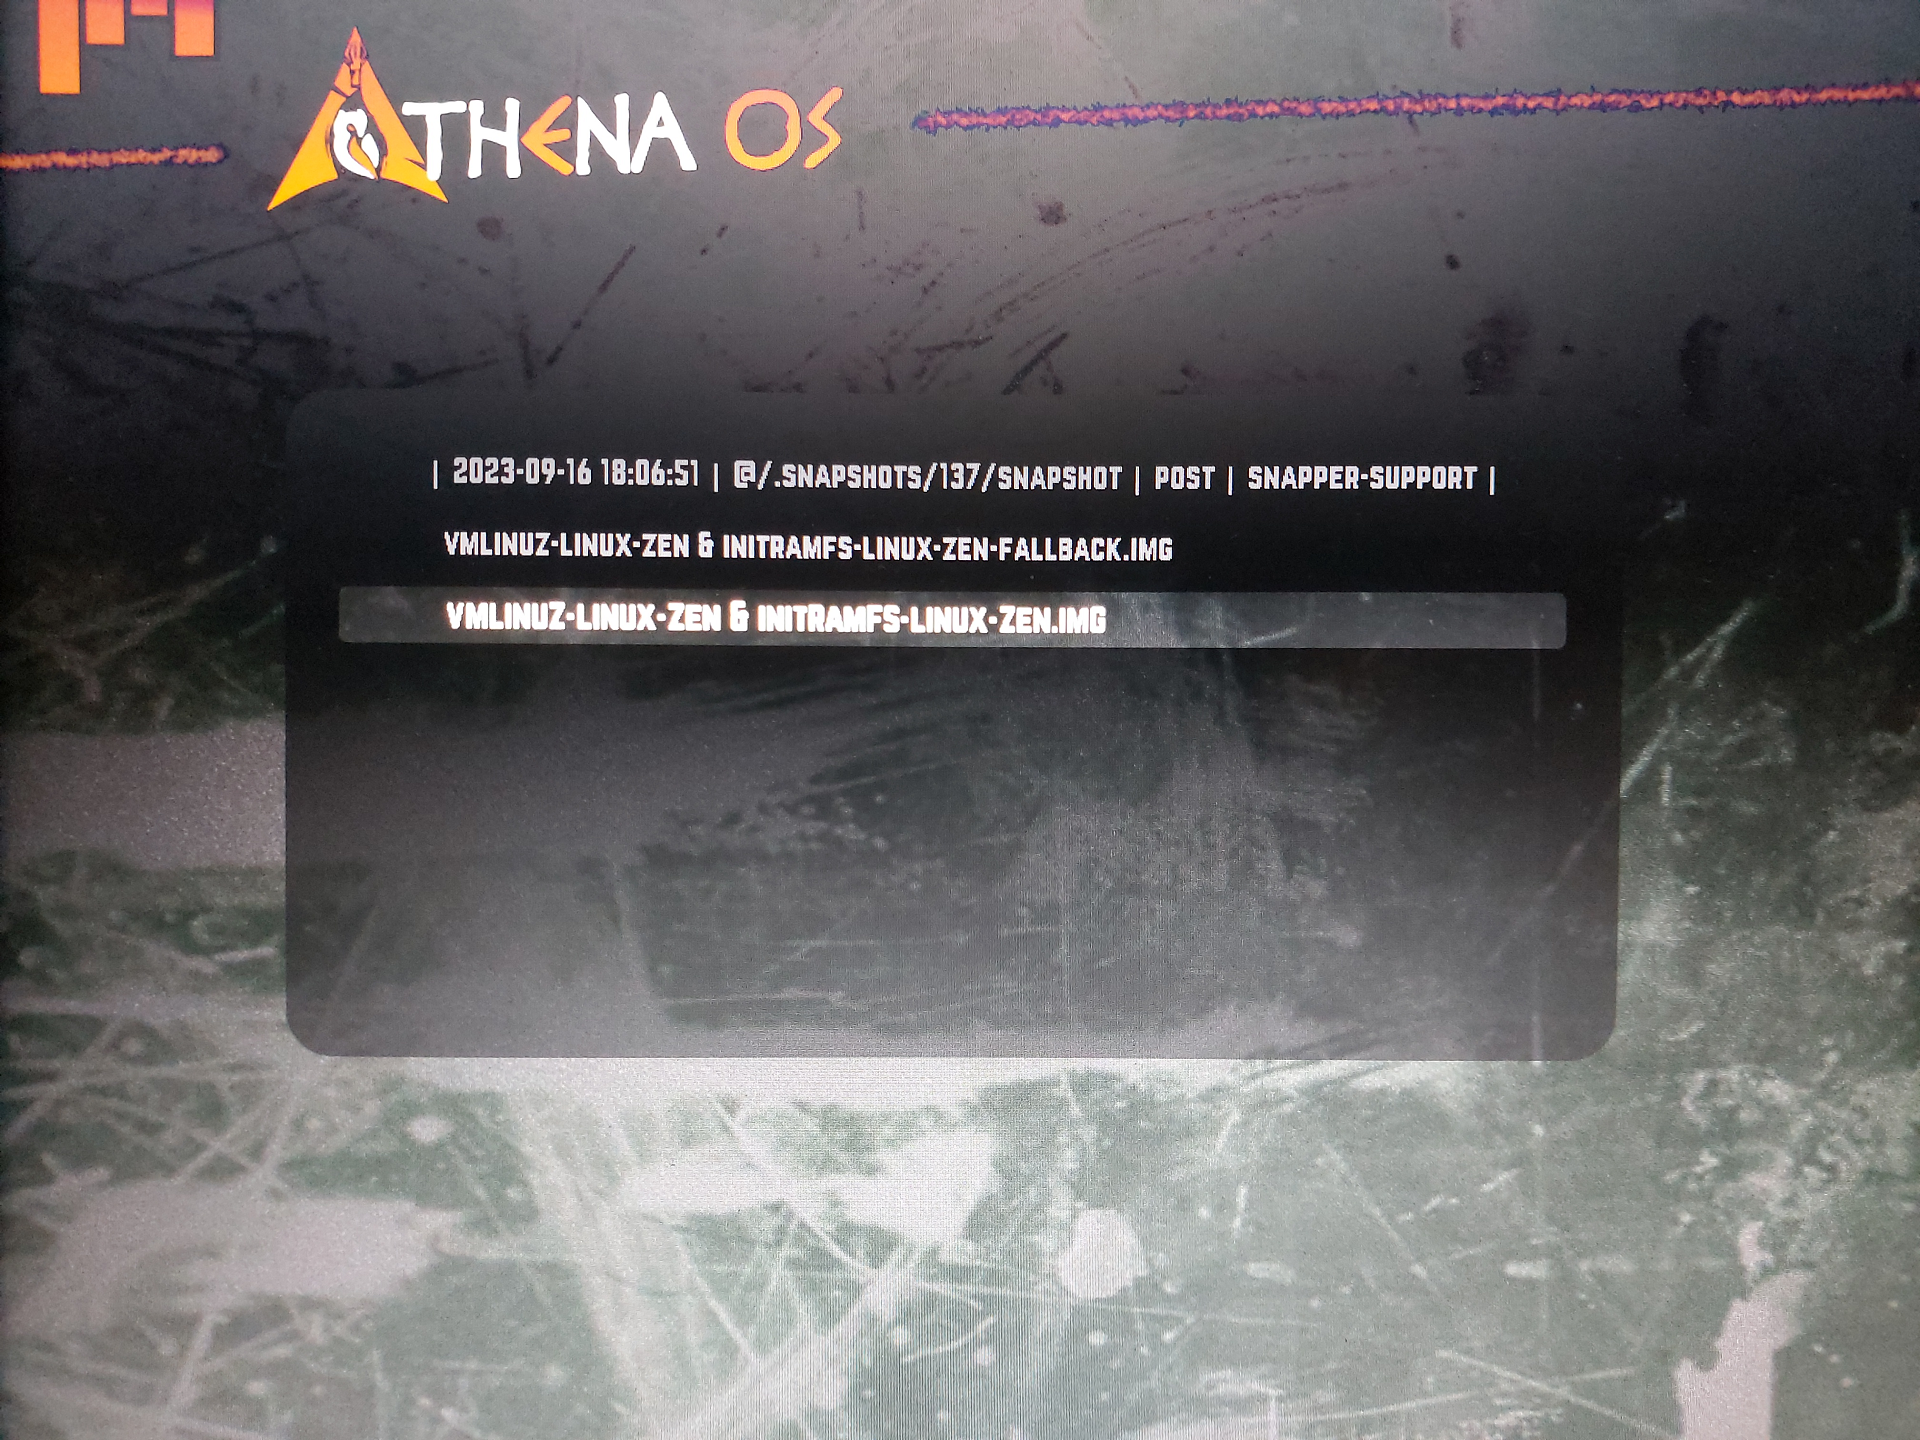
Restore system by snapshots in GRUB
Section titled “Restore system by snapshots in GRUB”In case you are not able to get in the system due to a broken upgrade or similar events, you can leverage on Grub BTRFS snapshots in order to restore a previous state of your system. To do this, run the system, on the GRUB select Athena OS Snapshots
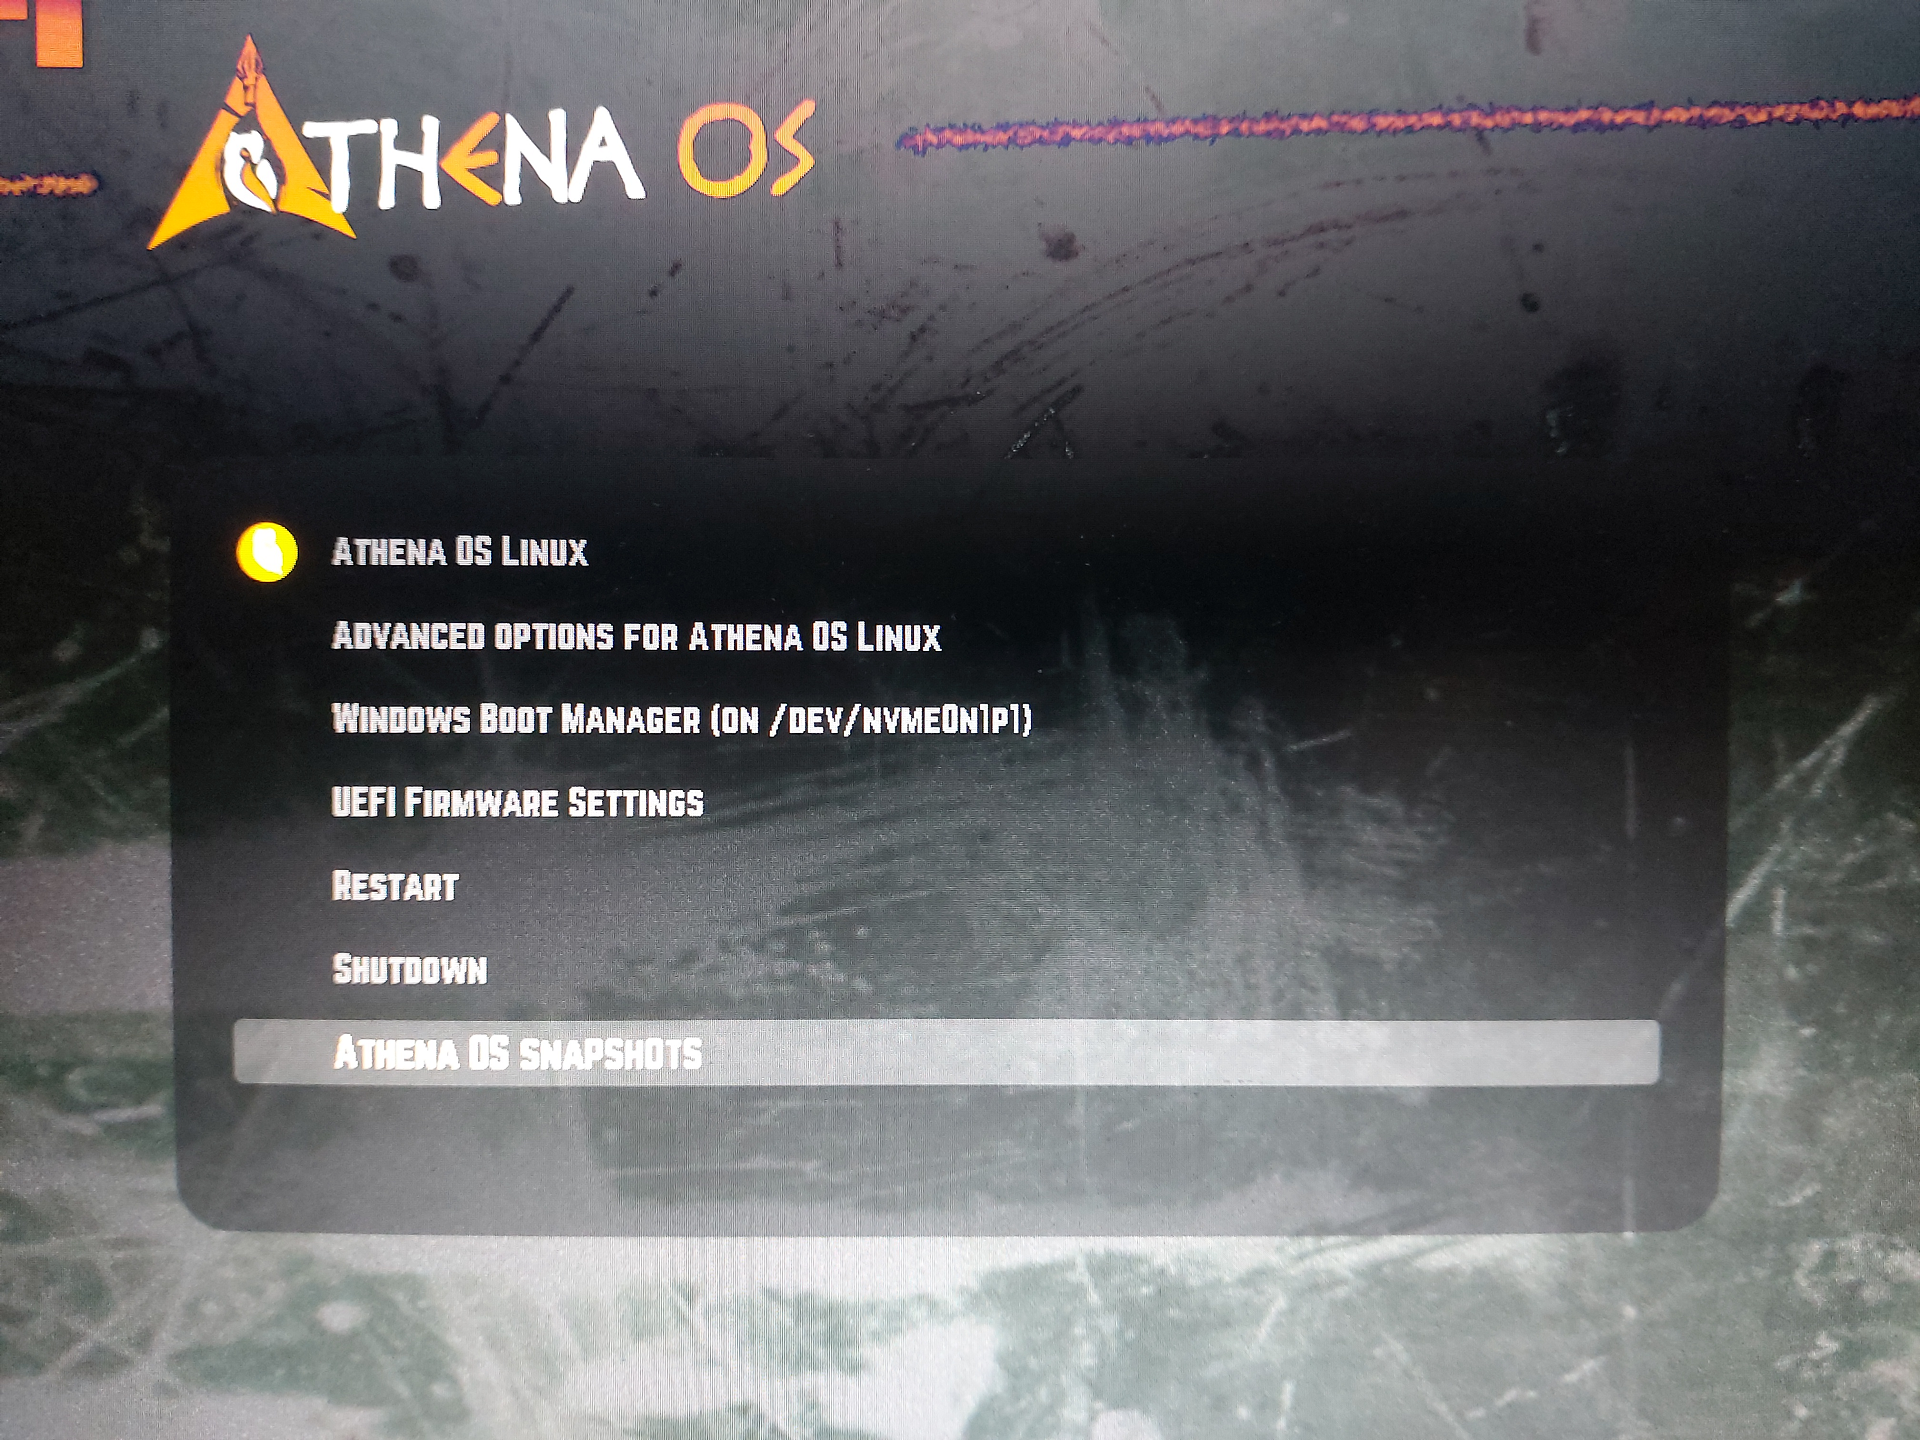
Choose the snapshot you want to restore

and select the Linux Kernel to run
Cannot store HTB App Token due to secret-tool hanging
Section titled “Cannot store HTB App Token due to secret-tool hanging”When you run htb-toolkit -k set and, by entering your App Token in the Password field secret-tool hangs, try to reboot the system. If it does not work, install Brave browser, open it and at first run a popup window asking for the creation of a new password is shown. You can choose to set a password or just press Enter two times if you don’t want, and finally try again htb-toolkit -k set.